A Very Brief Primer on Sharpening Bassoon Machine Blades
- ericarbiter
- Mar 15
- 18 min read
Updated: Apr 24
This is Part 1 of a two-part series:
Part 1 will cover the sharpening of reed machine blades
Part 2 will cover the method of adjusting the “correct” projection setting of the blade back into the machine.
Unless bassoonists are comfortable returning the sharpened blade back into their machine already, it might be best to wait for the second article to tackle the complete project yourselves.
❦
What I have discovered during the 7 years of working on bassoonist’s reed making machines since I retired from the Houston Symphony is that when the cutting blades are worn and dull then the entire machine seems to no longer work— or it just starts making the profile heavier and harder to profile the cane. At this point many bassoonists get frustrated and either buy a new machine —or begin to readjust the machine to offset the worn blade.
One of the pleasures I get in servicing reed machines is that often just restoring the blades and a basic cleaning and adjusting give new life to them. I find this very rewarding!
Before proceeding further, I’d like to quote a line from Christopher Schwarz’s terrific little book Sharpen This that I hope will shed some light on this whole process:
“It’s simple: Rub steel and rocks together and you can get a sharp edge”.
His book is a gem and is available to download for free. Here’s a link:
Schwarz gives a concise and uncomplicated way to sharpen our tools.
The only reason I am writing this article is because Schwarz’s book is for woodworkers who use chisels and gouges that have long handles and their blades are much larger than our profiling blades for reed machines. This article will bring Schwarz’s methods into our world.
Here is my outline of what is involved in sharpening bassoon profiling blades:
1. Types of “jigs” to hold the blades
2. Discussion of the types of sharpening media (Stones, diamond whetstones or sandpaper)
3. Sharpening sequence for restoring and resharpening blades
Profiling Blades and Holding Jigs
If you are lucky enough to have a profiling machine that came with its own dedicated sharpening jig designed specifically for your machine, you can skip much of the following text on finding a suitable jig for your blade. Two machines that come to mind are the Butterfield and Popkin profilers. However, often these jigs and other parts that originally came with the machines to set them up are often missing if you aren’t the original owner (and often even if you are—).
Profiling blades, compared to the gouging blade, are far easier for us to restore ourselves with relatively inexpensive tools. More on gouging blades further on.
I know several bassoonists who are also expert cabinet makers/woodworkers: Rick Yoder, Matthew Karr and Norbert Nielubowsky. Their woodworking tools are similar to what we bassoonists use but with one big difference: the chisels and gouges are much larger and are on long handles as I already mentioned. This makes it easier to hold their tools and also it makes it easier to keep the blades at the constant angle for honing and sharpening.
What I mainly learned from these bassoonist/woodworkers and woodworkers in general that they spend as much time sharpening their tools as they do using them.
We bassoonists tend to use our blades far too long before restoring their cutting edges (if at all…), and this is when the trouble begins: instead of sharpening the blade we readjust the machine trying to restore the results we obtained when the blade was sharp. This complicates our lives as reed makers much more than it should. We fail to see the root cause of the problem (the dull blade) and cast about for something to “fix” the trouble with our machines. We need a reed for tonight’s concert right now— getting to the root cause takes time….
My advice is to sharpen the blade and leave the settings of the machine alone, before the machine becomes a complete mess…. which is often what I find when I receive many of the machines that I service. This is a really important point which I will repeat throughout this article because I feel if I mention it only once it may be easily forgotten or dismissed as unimportant.
❦
Sharpening Jigs
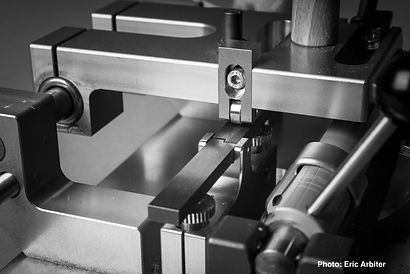
First, we need some device to hold the small profiler blades securely and must be held consistently at the “right” angle to sharpen the blade. The first angle is the angle of the bevel and the second is a micro-bevel of an additional 2-10°. The micro-bevel saves honing too much metal from the main bevel, by just touching up the last 1 or 2 mm of the cutting edge of the blade. This is where a sharpening jig of some kind is essential.
When I bought my Pfeifer single profiler in 1975 it came with these instructions for how to sharpen the blade and it showed a jig that Pfeifer had made to hold it at the correct angle with very brief instructions about how to restore the blade.

Figure 1
In the instructions, the drawing of the sharpening jig was crossed out and it said no longer made— which was unfortunate. I include this here, because there is other important information on this page.
Here is a photograph of a dedicated bassoon sharpening jig for the Reeds ‘n Stuff profiler to give an idea what we need and how the jig works:

Figure 2
Reeds 'n Stuff Sharpening Jig/Thanks to R&S for permission to use this photo.
It is a simple device to hold the blade at the correct angle(s) for sharpening. Note the bevel is flat to the blue stone.
One problem that I have run into, especially with older and out of production machines, is that there are variations in the bevel angles of their blades. I have noticed this especially with the old Pfeifer machines since these are by far the largest number of profilers I service. So although I do own a jig for my Pfeifer it won’t always be the correct angle for a particular blade I come across with machines I receive for service.
The bevel angles of some Pfeifer blades I have measured over the years are: 48.3º, 48.2º, 36.0º. A Pfeifer copy from Maine Tool Room measures 34.8º and Maine Tool Room’s Hunt Van Hoesen blade 35 º bevel. This machine was an updated version of Pfeifer’s double profiler. It is no longer being produced.
Other profiling blades:
Reeds ‘n Stuff Tip profiler (?) 20º
Reeds ‘n Stuff Profiler 30º
Rieger Profiler 44.3º
Rieger Tip profiler 44.3º
Reeds ‘n Stuff Gouger 30º
Standard bevel angles for chisels are: 20º, 25º, 30º, ºand occasionally 45º
I measure these angles with an inexpensive digital angle finder I got at a hardware store. I find this useful since I work on so many different machines with diverse bevel angles.
Bassoonists interested in only servicing their own machines don’t need these extra tools I mention. They just make my life easier when I encounter a machine with differing criteria for the restoration processes. It cuts down my time for the service — knowing the bevel angles to use on the sharpening jig I often use which is infinitely adjustable; time is money for my clients.

Figure 3
An adjustable jig designed by Arlen Fast shown with the DMT diamond whetstones
Note the second plate under the jig’s wheels to give an additional angle needed for the Pfeifer bevel. (The card under the wheels is to protect them from damage rolling on the diamond coated surface).
❦
Sharpening Stones or Media
After many years of trying many different types of stones (sharpening media), I have settled on the DMT diamond plates that include 4 grit sizes, and then continue refining the edge with the 3M micro abrasive films. I will detail this below.
Bassoonists just getting started in learning how to sharpen their own tools, the blue and red DMT Diamond whetstones, mounted on plastic blocks, coarse and fine are probably enough. Since I work on many different machines, some of them no longer in production, I often need coarser grits to restore severe damage to the blades.
I have to often work around the sharpening jigs I have. One reason I have gone to the thinner diamond coated metal plates is that they are easier to build up thickness under the plates to accommodate blades that don’t conform to the standard bevel angles; for example, the various vintages of Pfeifer blades are not consistent in their bevel angle and having a fixed holding jig often won’t accommodate an oddly sized bevel angle. I found I needed a very coarse stone to quickly restore badly damaged (chipped) and worn blades. (See Figure 3).
We can use any type of “stones” or even sandpaper for getting a fine edge. I started my reed making years with India oils stones and then hard Arkansas stones; I knew nothing of grit sizes. Gradually I worked my way to water stones and finally about 10 years ago I tried the DMT diamond whetstones in coarse (325 grit) and fine (600 grit), thanks to the suggestion of my HSO orchestra colleague, Elise Wagner.
I got along with these for a long time until I needed to do more elaborate restorations of blades bassoonists sent to me, some of them very badly worn and deeply chipped as I already mentioned.
I recently ended up with a set of DMT 2-sided flat diamond metal backed continuous grit bench stones (shown in Figure 3) in coarse/extra coarse and fine/extra fine in the following grit or mesh size: 200 (extra coarse), 325 (coarse) 600 (fine), and 1200 (extra fine). See figure 3
The advantage to these particular bench stones is that unlike natural or man-made stones, they don’t develop low spots from wearing out that need to be flattened with a diamond stone (anyway) to restore their surfaces to flat.
The diamond coating is on thick stainless-steel plates.
These 4 grit sizes will nicely restore a worn blade.
Polishing the blade
I have Norbert Nielubowsky to thank, for giving me information on this from an article in Woodworking Magazine on sharpening with sandpaper:
I mount these papers on a ¼” sheet of glass to keep them flat. The adhesive backing makes this easy. 15 micron (1200 grit), 5 micron (5000 grit) and .3 micron 12000 grit).
This brings the edge to a superfine sharpness that will cut paper by just lightly moving it across the cutting edge.
At this time, I’m wondering if this last polishing phase is a bit of overkill. I still do it because I like the working result, but it may not be necessary for many bassoonists.
Udo Heng has directions online for his sharpening jig and he recommends only 2 grit sizes to restore his blades: 500 and 1200 using the Missarka Blue Stone made in Germany.
Similarly, Mark Popkin’s directions for restoring his machine’s blade also only recommends 2 grit sizes: 150 and 400. See Popkin’s directions in for further reading at the end of this article.
As a note, the higher the grit number, the finer the grit; the coarser numbered grit size will hone a blade but the resulting surface of the cane will be quite rough with scratches rather than being smooth, by using finer grits.
Begin the process with a coarse enough grit to remove the curvature of wear or chips but not necessarily the coarsest (i.e.200) and working up through finer and finer grit sizes.
More about actual process follows.
❦
Trials and Multiple errors
You can check the condition of the cutting edge by holding a ruler against the edge and seeing if there are chips or the blade is curved inwardly. Often you can see the wear by eye.

Figure 4
One of the mistakes I made when I first started to work on my friend’s or colleagues’ machines about 6 years ago was to take around 20 strokes holding the cutting-edge perpendicular to a medium or coarse stone to eliminate the inwardly curved cutting-edge and/or chips of the profiling blade.
This was complete overkill! Here’s why: that edge might be around 3 or 4 thousandths of an inch in thickness- even when dull. To restore the flat across the cutting edge of the blade only takes 2 or 3 light strokes on a fine diamond plate. Doing it the way I did previously leaves the cutting edge very thick and it took me a lot of work to hone the bevel down again so that there was a zero radius edge where the flat side of the blade and the bevel meet at the cutting edge. A diagram will help understand this.

Figure 5
The basic concept is to take the fewest possible passes of the cutting edge to restore the blade to flat and square.
See the middle diagram on Pfeifer’s sheet above to see how to hold the blade to restore it to flat across the cutting edge: Figure 1
I determine this by holding the flat side of a ruler against the cutting edge and sighting using my reed lamp to a light surface behind to see if there are any gaps; if so, just a few more strokes usually restore it.
Once the edge is restored to straight then further work can begin.
The two key factors that took me quite a while to learn:
1. That the bevel and the flat side had to have this “zero radius” intersection and when sharpening the beveled side of the blade it will (when zero-radius is reached), throw a burr onto the flat side. Until you can feel that burr you haven’t honed the bevel (either primary or micro-bevel) enough.
2. The other simple but key factor I learned was that a dull edge (or one that isn’t brought to a “zero radius” point) will reflect light when you hold the blade under a reed desk lamp. See also Pfeifer’s note in Figure 1 about reflected light and purposely dulling the blade. More about this later. A sharp edge will not reflect light; there’s no surface to reflect it. It’s important to keep working until the cutting edge doesn’t reflect any light. It takes some practice to actually see this.
Grinding refers to the initial stages of coarse work if the blade is chipped and the bevel need to be reestablished due to damage. Typically, at least in my experience, this would be accomplished using a coarse or extra-coarse grit of sharpening media. This leaves wide, coarse scratches on the metal surface
Honing refers to refining out the coarse scratches on the bevel (and also the flat side) and can be done at the last few millimeters of the blade’s cutting edge. This is often referred to as the secondary or micro-bevel. I use the medium, fine and extra fine media for this phase.
Polishing refers to the last stage of “sharpening” and further refines the surface of the cutting portion of the blade removing the scratches so that the finished edge has a mirror-like surface. Here we can either use a leather stop with polishing compound or I prefer the micro abrasives films I mentioned earlier, down to a .3 micron grit size.
You can tell by profiling if the cane’s surface looks and feels scratched or is smooth. A blade that needs sharpening often leaves a scratched cane surface. Conversely a finely restored and polished blade leave a surface more like glass i.e. quite smooth. I will say though, that this is partly determined by the cane itself. A well-sharpened blade may not necessarily leave a very smooth surface if the cane is soft and coarse-grained.
As I mentioned, once the beveled side has been brought down to a zero-radius edge there will be a burr on the flat side of the blade you can feel. This is important and why I repeat it again.
To finish the restoration work, the last step is to remove the burr on the flat side.
To test the effectiveness of your work, draw the profiling blade’s cutting edge across a piece of printer paper. If the blade is sharp, it will cut cleanly through the paper without bending or folding it.
In summation, here is the sequence:
1) flatten the back (flat side) of the profiling blade
2) restore the cutting edge's straightness with a few strokes at 90º (see above, Figure 1)
3) hone the micro-bevel (only about 1 or 2 mm back from the cutting edge itself) until you feel a burr on the flat side of the blade. This micro bevel will only be 2 - 10º more than the main bevel— so if the main bevel is 30º the micro bevel would be around 33-40º. The micro-bevel should only be about 1-2mm behind the cutting edge, so whatever angle you need to achieve that is enough. If the micro-bevel is too steep the blade may not cut.
I go through several grits for this step: medium, fine and extra-fine. You can flatten off the burr between each grit or wait until going through all the grits so you don’t have to remove the blade from the jig to flatten the back of the blade.
4) (Optional) Finish with the micro-abrasive films to polish the blade or use a leather strop with polishing compound.
5) end with the flat side of the blade on the sharpening media by removing the burr.
If you've gotten it really sharp it should slice through printer paper easily. I repeat this because it’s important.
I can now restore a profiling blade in fifteen or 20 minutes, after servicing so many machines. Once you get the feel for the process (which takes a lot of words to describe) you can too. For bassoonists deciding to restore their own profiling blades once all the materials are bought you can service your own machines twice a year or whenever you notice it getting more difficult to profile and the thickness starts getting heavier.
I include Mark Popkin’s brief but very informative instructions below (for further reading) as a copy he included with his machines.
❦
When To Sharpen
It’s much better to leave your profiler’s settings as they are and address the blade’s condition, rather than change the settings, chasing after a worn blade. It saves a lot of time and headaches. I know I’m repeating myself- it’s important.
I will mention here that resetting the profiling blade to the correct or at least the same projection past the cane hold-down bar is the next step in resetting a profiler.
The restored blade is the first step, then setting it to the proper projection is the second, and that step is critical to not having to re-invent the wheel each time your profiling blade is removed and replaced.
For the Reeds’n Stuff and Rieger machines, both manufacturers produce a dial gauge for accurately resetting the blade to the factory designed correct projection. It’s not essential to have this gauge; setting the blade can be accomplished by using the thickness of the cane slice as a guide. The gauge just makes it “foolproof” and easily repeatable, but it adds around $150 to your toolkit.
Without such a gauge, you can set the blade by measuring the thickness of the ribbon of cane the profiler takes off on the initial passes and then reset. For example, Reeds ‘n Stuff and Rieger profiling machines are designed to skim off about a .003” ribbon of cane with each pass.
Older American machines such as the Pfeifer, and Pfeifer knock-offs (Hunt/VanHoesen); these tend to take a much thicker slab of cane off with each pass— my Pfeifer was set by Pfeifer, to take off a .015” “ribbon of cane”. This will completely profile the cane in 2 or three passes BUT if the blade is too sharp (see Pfeifer’s caution) you can catch and tear off the cane.
The Pfeifer double machines are different in that they tend to need a much thinner cane ribbon. I’ve been told this by several of Mr. Van Hoesen’s students who learned to set the depth of the blade by feel rather than using the limit bar to set. They then will take off much less cane on each pass — more like the Rieger and Reeds ‘n Stuff profilers.
❦
A Continuation Follows
I will write a follow-up article on setting the profiling (and gouging) blades to the “proper” projection depth. This is a complicated subject depending on the engineering of the particular machine’s design.
Some machines are ridiculously simple to set correctly and others are maddening. I hate to leave bassoonists hanging at this point but the article will probably be fairly long due to the diversity of designs and available taking into account the new machines in production. Many older machines are still solid and can be brought into good service with a little TLC.
For those bassoonists with older machines, once the issues are explained and understood they can also be relatively easy to set up to repeatedly produce excellent results. In this regard the Pfeifer machines, at least in my experience, are challenging but ultimately solvable.
❦
Gouging Blades
For gouging blades I use:
They have the correct tools for working on curved blades and their charges are very reasonable. I have tried with limited success to sharpen gouging blades myself but since I don’t have the necessary tools which are quite expensive, I have decided to let the pros do this. I have used Ross Cutlery now for many years to sharpen my Sassenberg gouging blade and now my Reeds ‘n Stuff blades and they do a superlative job.
For Further Reading
Sharpen This by Christopher Schwarz (free download): https://blog.lostartpress.com/wp-content/uploads/2025/10/Sharpen_This_Aug2022pdf.pdf
This is a great resource. I learned much of my further education on sharpening from this short book once I started servicing other bassoonist’s reed machines. Anyone wanting a great general introduction to basic and easy sharpening can’t go wrong with this book. Here’s a note from Schwarz’s website:
“Yesterday, I gave Katherine (my daughter) a refresher lesson on sharpening her tools (I first taught her when she was 9). Then I set her to work sharpening all the student tools for a class I’m teaching this weekend.
The lesson took about 10 minutes. And all the tools she sharpened ended up perfect and ready to go.
This could be you. Sharpening isn’t hard. It is simply rubbing steel on rocks. Homo sharpenthis stuff. If you are struggling, now you can download (for free) the book I never wanted to write: “Sharpen This.”
Here’s the link to download it. No, it’s not a trap. You don’t have to register, give up your email or request Sea Monkey information through the mail. Just click it, and the 120-page pdf will download to your device.
I’ve done this with my other books as well. I want the information to be free (that’s the anarchist in me).
You can still buy the book for $20 (and get a rude sticker) from our store. The book is also signed by me, so you can learn to fake my signature and kite checks with C…”
The Perfect Edge, by Ron Hock. This is a much longer and exhaustive book on everything about sharpening you ever wanted to know- Probably too much for us bassoonists….. but still—
Sources for Sharpening jigs useful for bassoon profilers
Currently there are several devices or jigs for holding profiling blades. Bob Williams (Womble Williams) has two jigs.
Checking his website there is one for Pfeifer and Popkin which were American made machines and another that fits the Rieger (and Reeds ‘n Stuff), both German machines; this is good news for bassoonists who own these machines. I emailed Bob and he says to specify which machine you have so he can send the correct one.
I recently learned the Udo Heng (Reeds ‘n Stuff) is producing a very reasonable sharpening jig for his profiler. On the website he also gives concise direction for sharpening.
The jig holds the profiling blade at the correct angle of the bevel and by adjusting slightly at a slightly steeper angle a micro-bevel usually between 2 and 10 degrees. This micro-bevel saves taking too much metal from the blade.
Arlen Fast also has produced a terrific adjustable jig for both American (Pfeifer, MD and Hunt-Van Hoesen type blades at ½ inch widths) and European blades (Reeds ‘n Stuff and Rieger and others at 10mm width); you can adjust the holding angle infinitely through a wide range of angles. See Figure 3.
Arlen’s are produced on a very limited basis and are therefore rather costly. You can email him to see if he has any in stock and what his prices are. I use his jig all the time.
Mark Popkin’s instructions for his machine. My notes as to the grit size of the Norton Double Grade India stone he mentions are 150 and 400 from the Norton Website.
Mark Popkin’s instructions
with some annotations by Eric Arbiter
Sharpen That Blade! Do it Yourself!
Blade sharpening is a two-step process. I use a 6x6 x1 inch double grade Norton India Stone and any light oil for stone lubrication and use the stone’s finer surface exclusively. [I use the DMT diamond plates because you use water as a lubricant which won’t be absorbed by the cane like oil will. You can also use waterstones— EA]
Step 1. The blade will eventually wear in a semi-circular configuration at the cutting edge. A new, flat surface must be created to permit accurate sharpening. Resurfacing is achieved by rolling the jig back and forth along the stone’s fine surface. [I have adopted only rolling the jig backward, i.e., away from the cutting edge; I feel it throws the burr toward the flat side of the blade more effectively… but I could be mistaken; it’s just something I do. I lift the blade to roll the jig forward to the starting position, then drag backwards. —EA]
Install the blade in the sharpening jig such that the Allen bolt and washer is located near the top of the blade slot (furthest from the cutting edge). Using the profiling machine ramp adjusting Allen wrench (9/64”). [With your jig — your wrench will probably be a different size— find the adjustment of the holding bolt where the bevel is flat to the stone; see Figure 1- the Pfeifer instructions or Figure 2. You can sight this by eye observing the angle using a straight-edge viewed from the side—rather than on the stone. — EA]. Resurface not more than 1/3 of the blade flat near the cutting edge to save time and effort. You might have to experiment a bit to locate the appropriate blade position. You must create a burr (material deposited on the opposite blade side) across the entire blade edge to create a new cutting edge. Finishing resurfacing with very light effort to achieve a fine flat. Check with your finger for complete smoothness of the flat side near the cutting edge.
Step 2. A very efficient edge is achieved by creating a new edge with a sharper chisel angle than that of the blade (35 degrees). [Often referred to as a micro-bevel— EA]. Readjust the Allen bolt such that it is now located at the bottom of the blade slot (closer to the cutting edge). [In other words, move the blade so it interfaces with the stone or plate at a sharper angle; this can be 2-10 degrees but the main thing is to just have this secondary angle, the micro-bevel, only be 1-2 mm from the cutting edge. — EA] Create a very thin cutting edge by rolling the jig and blade carefully along the stone’s fine surface. Check for evenness across the tip. Repeat resurfacing very lightly for a fine surface. Remove the blade and remove the burr. Now lightly wipe the blade (hand) held in one direction at a 45-degree angle to the stone. The direction is not to cut into the stone but to wipe away from the cutting edge. Remove the burr. That’s it!


Comments