Setting up a Template on Tip Profilers (Reeds 'n Stuff and Rieger)
- ericarbiter
- Jan 22, 2023
- 4 min read
In April of last year (2022) I had promised an article on setting up a tip profiler either when changing patterns (templates) or after changing the blade. Since that time I had asked Udo Heng of Reeds ‘n Stuff to make a custom pattern for his tip profiler. I had such a custom pattern made for me years ago by Georg Rieger. You can read about the development of it here and Johann Rieger’s current offering which is identical to my original:
https://www.ericarbiter-thewayofcane.com/post/rieger-custom-tip-machine-pattern-60-is-now-available
My thought was to have this variation of tip machine pattern available for both the Rieger and Reeds ‘n Stuff tip profilers in case any readers of my book, The Way of Cane, wanted to try them.
One thing I would suggest if any bassoonist with a Rieger tip profiler is interested, they might consider contacting me to try a reed using this pattern before investing in the new pattern. For bassoonists with the Reeds ‘n Stuff tip profiler, they will allow a trial on any of their patterns. Then you can see if it works with the rest of your equipment— your shaper and profiler.
One characteristic of this pattern is that the narrow spine or heart of the reed is relatively heavy up near the tip of the reed so that it’s important when using it to make sure that the main profile isn’t too thin in the front 1/3rd of your profile. If it is, the full potential of the pattern is lost. The idea (based on Bernard Garfield’s reed design as well as Walter Urbach’s— which are both very similar) is that the heavier spine is counter balanced by the much thinner channel running down either side of the spine. With this strength in the center of the profile in the front of the reed, the e and c# in the staff have less tendency to drop in pitch.
Setting up the tip profiler with any pattern can be done several ways. One way is just trial and error. This can waste a lot of blanks unlike trials for setting up gougers or profilers. Even so, by making the right mistake with those machines by starting out heavy and adjusting thinner on the same piece of cane, is a good way to go.
One thing I have been doing in servicing bassoonists machines for the last few years has been to use automotive thickness feeler gauges to do an initial rough set up on the machines before using cane at all. This can get me very close to the final dimensions which I test by using cane to see the machines real life (not theoretical) output: that is the gouged, profiled or tip profiled piece of cane or reed.
Here’s a photo of an automotive feeler gauge that can be found in any auto part store for less than $10. I have three sets of these; one of them goes from .001” to .032” (.0254 mm - .81 mm). If that isn’t thick enough to check the collar side of a profiler then you can use two different thicknesses to get to your desired thickness— for example the .018” and .020” leaves (gauges) to get to .038”.

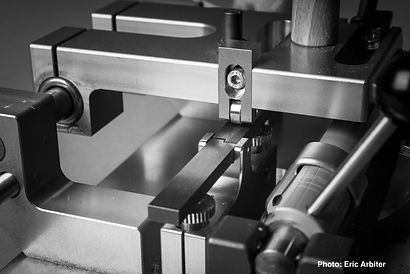
With this gauge you can check the clearance between the blade and the parts of the profile you are setting. Here is a photo of setting up a new tip profiler pattern on my Reeds ‘n Stuff machine by setting the thinnest part of the profile at the corners at the tip.

You can see the carriage is at the tip portion of the pattern and I’m measuring the clearance under the blade at the tip on the corner far side of the machine. The reason I measure here for this particular pattern is that it is based on four finished reeds I bought in 1974 from Walter Urbach that worked really well for me. The thickness of those reeds at the corners were consistently .008” (.203 mm) which you can see is the value of the particular feeler I’m using to check the clearance.
This is not a must on where to set a tip profile pattern up. For your particular reeds you might check the center at the tip or a distance behind the tip. This all depends on the reed design that works best for each bassoonist…. though sometimes we don’t know which one that might be!
The nice thing about the R&S tip machine is that you can move the pattern forward or backward bringing more or less tip or strength to the blank.
What if I am trying to set up this machine for a .008” corner and that isn’t the value measured by the clearance? In this case it wasn’t— it .012” as I found by measuring using the feelers. Then I selected the .008 feeler, placed it at the tip corner and after loosening the hex lock screw I adjusted the general thickness adjuster until I could just feel a slight drag on the feeler.

It takes some practice to develop a feel for what is too much or little “drag” on the gauge.
Here’s a photo of the same procedure for the Rieger tip machine:

This second photo shows changing the thickness adjustment on my older Rieger machine.

I have the feeler in place at the tip’s corner and I’m adjusting the general thickness screw to give me the right clearance. I have an older Rieger machine that doesn’t have the small fine calibrated adjuster like the one on the R&S. Rieger’s current machines now have this feature.
I should mention that before changing the thickness adjustment with either of these machines that the locking screws have to first be loosened.
For my next entry I will go through setting up profilers using this feeler gauge method.


Comments